Tampilkan postingan dengan label Tips & Techniques. Tampilkan semua postingan

Removing Horizontal Fold Under the Tummy

Some women experience horizontal fullness or bagging directly beneath their tummy and just before the crotch curve begins.  Once you've sewn your test muslin for your pants, if this is occurring, you will find one suggestion for a minor tune-up on page 12 (#1) of the Pants Kit Instruction Book.  This may be a satisfactory refinement for you.


Another alternative is to remove this fold of fabric at CF. Follow these directions:
1.  To determine how much you need to remove, pinch out the fabric in a tiny fold.  If you pinch out 1/4" (.6cm), this will mean that you will be totally removing 1/2" (1.3cm).


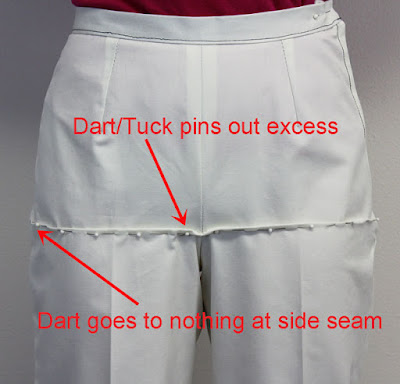
Close-Up of dart/tuck wedge from CF going to nothing at the side seams.


2.  Mark this level location of CF of the crotch seam.  Draw a perpendicular line (to the grainline) over to the side seam.  Mark point A and B.


3.  Cut from CF to side seam, leaving a small hinge of paper at the side seam. This will act as a pivot point.  Secure the pivot point with plastic tape.


4.  Overlap the CF seam the amount you require, thereby crating a small horizontal dart or tuck which begins at CF and goes to nothing at the side seam.

5.  True the CF crotch seam.

6.  The more you overlap at CF, the more the waist edge tilts down and angles the CF seam.  To maintain the original orientation of the upper CF seam, when you true the crotch seam, you will be crating a narrow wedge as indicated by the green arrow.  (The blue line indicates where CF at the waist edge originated).


7.  Cut/remove this narrow wedge and tape it back in place at the side seam waist edge.  This will maintain the correct waist circumference and true the side seam shape so that it will sew in the same curve to the back side seam.


8.  Redraw and reposition the front hip-fitting dart to best suit your body contours.

9.  Bring the straight of grain up from the leg.


This process will shorten the CF crotch length by the amount of the dart/tuck.  Be aware that you may need to add this amount on to the back crotch length so that you maintain your overall crotch length requirement.

Happy Sewing!

Glenda... The Good Stitch


Pants - Curving the Center Front Seam for the Protruding Tummy

As we age, many women develop a fuller tummy/stomach pouch.  Sometimes this is primarily at CF and immediately underneath the waist.  For other women, this rounding/fullness is not only under the waist, but it also spreads horizontally.

When you have this little belly/pouch, you will often experience fullness in the CF seam right underneath the pouch.

However, sometimes it fits just fine under the pouch, but you'll see drag lines/wrinkles pointing up toward the center of the tummy fullness.  If this occurs, then consider this CF crotch seam refinement.

Rather than maintaining CF as a 'straight line', it can be slightly curved right where the tummy fullness is located.


The result is that:
1.  You wouldn't be able to put in a zipper fly at CF - since you need a straight seam for this application.  But a zipper front might not suit your body shape anyway because of the tummy pouch.

2.  With a curved CF seam, you wouldn't want to sew with a stripe or checked fabric, as you'd end up with a 'chevron' effect at CF which likely wouldn't be that flattering.  Choose solid colors.

This added curvature doesn't need to be a lot to make a substantial difference.  So even though this refinement might sound a little strange, it really does work.

Here's a photo of a happy seamstress, as these are the best fitting pants she's ever worn.  In this photo, her blouse is tucked in to show the excellent pattern fit, but typically she only ever wears her blouses out over top of her pants.  This refinement really does work well!


Happy Fitting & Sewing!

Glenda...The Good Stitch

A shaped Back Shoulder Yoke

Vest Success continued...
In early April, I published a blog called Vest Success.  One of our SFD ladies designed the Reversible Vest (a relatively new SFD downloadable Fashion Leaflet).  This particular lady had a back shoulder dart that she needed to deal with.  She needed the back shoulder dart for her slightly rounded shoulder blades, but didn't want the dart appearing in her vest.  When drawing the vest pattern, she simply transferred this dart into the armscye and the resulting slightly curved seam took care of the dart and she ended up with a yoke detail in the back of her vest.


Because her photos were somewhat dark, I simply outlined the stitching lines that she designed.  Now you can see where the back yoke is.

Not long after this blog was published, another SFD lady asked if I would show you the details for turning the back shoulder dart into a yoke with slightly curved stitching line.  The easiest way for me to do this was to film a short video showing you the process.

First, let's review how to add a back shoulder dart.
Step 1: Draw line A to B as illustrated.  This line should be at a level where the most rounding or protruding fullness is on your back/shoulder blades.  Then draw line C to D as shown.  This line does not have to be at a right angle to A-B, but the angle that you choose will affect the final position of the dart, therefore, it should be at a pleasing angle for your specific body shape.  You may need to sew a couple of tests to make sure you're pleased with the results.
Step 2: Cut from A to B and from C to D, leaving a paper hinge at the armscye point B and at point D on line A-B.
Step 3: Spread the shoulder area of the pattern open as shown always maintaining the paper hinge points.  This will open up a small dart shape in the shoulder seam line and will automatically lengthen CB.  Often people with rounded, protruding shoulder blades also have some rounding at the upper back and this extra length will help the bodice back to sit more comfortably.  Additionally, depending on how rounded your entire back is, you may also want to add a CB seam which is shaped/curved to suit your body contours.

Step 4: The more you open/lengthen CB that results in a wider dart, the more the upper and lower center back line becomes 'jogged'.  To maintain CB on the fold of the fabric, simply draw/true a new CB from the back neck point to the waist point.  Also re-establish a parallel straight of grain marking.  Depending on how accurately you measured your CB waist length and where this length is actually needed, you may now need to shorten CB at the waist edge and gently true from CB to the side seam.
Step 5:  This technique for adding a shoulder dart shouldn't distort the armscye significantly.  However, if the armscye appears to angled at the armscye hinge pivot point, make sure to blend/true to create a smooth curve.
This is what it looks like in 'real life'.

Now, on to changing this back shoulder dart into a back shoulder yoke that is slightly curved.  It really is a simple process.  Please watch this video to see how to accomplish this technique.

Just click on the forward arrow to begin play.  It's a short video and a simple process.  I know you'll find it easy to do.

Kindly,
Glenda...the Good Stitch!


Double Back Darts

This topic of double darts at the pants waist edge is well worth repeating.  I just had to show you another example of how adding a second dart at the waist line of your pants pattern can really improve the fit.

If you go from a relatively small waist to quite full high hips, I highly recommend adding a second dart to the waist edge of your pants pattern.

This lady attended one of my recent Fit & Sew Retreats.  She has a pretty dominant swayed, dipped center back (at the waist edge), quite full low hip measurement and thin legs.

Here's the result:


She's always had difficulty getting any pants (or skirt for that matter) to fit.  That's why she attended the Retreat.

Keeping in mind these are test pants, where every wrinkle and nuance shows, you're seeing a near to perfect fit at the waist and in the hips and a beautiful hang on the leg.  From a side view you're seeing a perfectly straight side seam.  CF needed to be raised slightly, but that was refined in the tune-ups.

In the above close-up, you're seeing the position of the 2 waist-fitting darts.  They shape her hip shape well.

She did a great job of drafting her pattern and the results as so worth her effort.  Well done...and great fit!

To see how to add this second waist-fitting dart, please watch this short video tutorial.


For any of you ladies who might fall into this category, you'll want to give this a try.

Kindly,
Glenda...the Good Stitch!

Zipper Scratchies!

Protect yourself from those darn 'zipper scratchies'!

Sometimes when wearing a garment with an invisible zipper, the end of it - where the zipper stops - can be rough and scratchy.  Here's a quick tip on how to cover that end before you insert the zipper.

1. Use a soft, yet dense enough strip of fabric like cotton interlock.  Cut the strip 1" (2.5 cm) by about 2 1/4" (5.8 cm) wide.
2.  Lay this strip on the right side of the zipper tape with the cut edge almost on the end of the zipper.  Stitch directly beneath the zipper stop across the width of the zipper.

 3.  Trim some of the strip to remove excess bulk.

 4.  Fold the fabric strip around to the wrong side of the zipper wrapping/enclosing the ends of the zipper tape.

5.  Then from the right side, stitch in the ditch, sewing through all layers to secure it in position.


6.  Proceed with the normal application instructions to insert an invisible zipper.

...And on the inside, it looks like this...

This soft, little piece of fabric protects you from the 'zipper scratchies'.  It's a quick little technique.  Give it a try the next time you apply an invisible zipper.

Kindly,
Glenda...the Good Stitch!


Skirt Styles to Suit Just You!

In the survey from a couple of weeks ago where I asked what Sure-Fit Designs can do for you to help with your fitting and sewing, a number of ladies asked for information on how to choose the best style of garment for their body shape.

Enter in Inside Out Style and Imogene Lamport.  She does a remarkable job of teaching you what your body shape is and what styles will look best on your frame.  I wouldn't even try to duplicate her expertise when she does such a good job.  I actually introduced Imogene to you a number of months ago, but this is definitely worth repeating, particularly for all our newcomers.

A couple of days ago, her blog post was titled 'The Best Skirt for Your Body Shape'.  I'm going to encourage all of you to take a few minutes to scroll through her blog site...there's more where this came from.

This is an informative blog and as you get into her Body Shapes page, you'll discover all kinds of valuable information on analyzing your body shape and learning what styles look best on it.

She doesn't always talk about specific garment styles for body shapes, but I always find her blogs of value.  If this is a topic of interest to you, her blog is definitely worth following.

Thanks so much, Imogene, for sharing your vast knowledge on this topic.

Kindly,
Glenda...the Good Stitch!

T-Shirt Tactics

Everybody loves to wear T-shirts.  For some they are a wardrobe staple - for others they are only occasional wear.  Whatever their place is in your clothing needs, you have choices within the Sure-Fit Designs fitting and designing system as to how you approach this style of garment.

Typically, the T-shirt is relatively close fitting and does not have a bust dart and is sewn from a knit fabric.  The no-bust dart feature does present a problem for you full-busted women.  You all know you will always achieve a superior fit when your pattern has a bust dart.

The Sure-Fit Designs pattern kits provide either the darted bodice pattern from the Dress Kit, or the undarted pattern from the Shirt Kit.  Most of you already know that the Dress Kit bodice has 2 1/2" (6.4 cm) ease in the bust circumference, whereas the Shirt Kit has 5-6" (12.7 - 15.2 cm) ease in the chest circumference.

Which kit to use for your T-shirt?   Since the T-Shirt is usually undarted with a closer fit to the body, you'd use the Dress Kit bodice (with the bust dart).  If you use the Shirt Kit, you'll have a looser fit and a much deeper armscye.

Ah Ha!  In comes my new article, T-Shirt Tactics, where I offer an alternative which uses the Dress Kit bodice and I show you how to remove the dart!  The result offers a fit that is closer to your body, the armscye is not as deep as with the Shirt Kit, and this process generally provides an excellent T-shirt alternative.

Yes I know it doesn't have a bust dart anymore, so you full-busted ladies will inevitably end up with some folding in the armscye that points toward your bust.  And no doubt, the shirt will likely hike up somewhat in the front because your don't have that bust dart shaping your bustline.  But since you are going to be sewing with a forgiving knit fabric, usually these issues are minimized.  But at least, you have 3 great choices now to design your favorite T-shirt with the Sure-Fit Designs patterns.
  • Dress Kit bodice with dart
  • Shirt Kit pattern - no dart - deeper armscye
  • Dress Kit bodice without dart
To download your copy of the T-Shirt Tactics article with instructions to remove the dart, please Click Here, then simply scroll toward the middle of the page where you'll see the link for the .pdf file.
Just for fun and for interest, I finished my T-shirt with a self-fabric 2 1/2" wide band at the hem level, scooped the neck edge 2" all the way around and then filled in with a 1 1/2" self-fabric band.  A small tab was inserted at CF while applying the neck band and finished with a decorative button.

And another great benefit is that it can be 'Made in a Day'!  It's just one more quick project for you.

Give it a try and send me your comments and photos.  When you send your photos, I'll put together a T-Shirt collage...and show off all of your work.  Please send photos to info@surefitdesigns.com.
Enjoy,
Glenda...the Good Stitch!

All my patterns...

During my Fit & Sew Retreats, we always discuss how and where to store all your SFD patterns that you end up drawing.  Over a year ago, I did write a blog on this very topic, but since we have a number of new members, it's a good idea to share this information once again.

From one of my recent Retreat attendees, this suggestion was offered.  Barbara (from Utah) sent this idea and these photos.  First, get a couple packages of Velcro cord ties and Key Tag labels.


And you'll need on over-the-door fabric stabilizer organizer - which she thinks she purchased from Nancy's Notions.


Each pocket holds a different group, ie. personal body blueprint, bodice patterns, pants patterns, shirt patterns.  Just roll your patterns, use the colorful Velcro ties with a key tag (write on the tag what the pattern is) and into its home over the door it goes.  Since this organizer bag is designed for storing stabilizer, it's wide enough for the widest roll of SFD 24" wide tracing vellum.


This is a great idea if you don't have shelf space for your patterns.  And the tags make it easy to read what each pattern is.  The vellum doesn't get creased - your patterns are easy to grab and re-use.  Personally, I'd likely also roll the patterns on an empty paper towel tube - just to make sure there are no unnecessary folds or creases.

To see the other pattern storage ideas, Click Here.

Barbara...thanks so much for sharing!

If you have other techniques for pattern storage, please comment and or send a photo.

Kindly,
Glenda...the Good Stitch!

Squishy, Spongy, Stretchy!

Topstitching a fabric that is squishy, spongy and stretchy is no fun!  And on top of that, the fabric I was using was a leather-like stretch, which meant once the needle pierced the fabric, it left distinctive holes.  And on top of this, the fabric would not press flat, which made it very difficult when turning and pressing seams.  No second chances on this project!

Here's what the finished jacket looks like.


It's a Sure-Fit Designs knock-off of a jacket I saw in NYC.  Exposed zippers are ever so popular.
Mine of course, being all black, doesn't have quite the bizazz appeal like the black & white ready-to-wear, but it's still a stunning jacket.  And the SFD version does have a shoulder yoke - just not as deep in toward the armscye area.

This blog is going to focus only on the topstitching process and tips that I'd like to share with you if you ever come across this type of situation.  Since I knew I had one chance only to get it right, meaning evenly spaced, straight, no skipped stitches and no puckers, testing prior to the final topstitching was definitely required.

Yup!  This fabric is great to look at, but it sure did have it's challenges.  It just simply wouldn't feed well when the leathery side is face up.  I'd purchased both a solid black as well as a perforated patterned piece.  I got them both in the Stretch House during my NYC excursion.

I combined both these fabrics in this jacket.  With a traditional seam, if right sides were being sewn together, it wasn't a problem, but if you needed to topstitch...well - watch out!  It has kind of a leather-like look and a little bit of a sticky feel.

The feed dogs didn't like it.  The walking foot didn't help feed the under and upper layers equally.  Perhaps a roller foot would have worked, but since I didn't have that machine attachment another solution needed to be found.

After much testing, I settled on a paper-like tear-away stabilizer.  I had 3 different ones to test and ended up using this Sulky Tear-Away.  It's years old and I'm sure the price is more than  $1.99 now, but for this project, it worked the best.
What did I test before sewing the one and only chance I was going to get?
First, I recreated a seam scenario as close to what the finished jacket had - meaning the solid black fabric was on the underside of the lapel.  The perforated fabric was on the top side.
Then I tested:
  • the best needle choice to prevent skipped stitches.  Of course, new is always preferable.
  • stitch length - what would look the best on the finished edge.
  • which stabilizer tore away the easiest without too much pulling and stress on the stitches.

This is just a photo of the test sample.  I did about 3 different swatches.


After choosing the most appropriate stitch length, best needle and stabilizer, I prepared the stabilizer.  It had to be cut in the exact shape of the neck line curve so that I could lay it in place and see the folded edge of the seam.  I used the pattern's neck edge for this.


Then I took a deep breath, centered my thoughts and began topstitching.  Remember, I had only one chance at this - this fabric was so unforgiving that I couldn't pick it out if I happened to sew crooked.


Here's a close-up of the stitching before the stabilizer was torn away.


Next came tearing the stabilizer away.  Even this needed to be done with control - one side at a time for both the upper and under layers.


When it was all said and done, I was quite happy with the results, but I'd been agonizing over this final process for the last few days, knowing that it was one chance or the whole thing would be ruined.

Here's a close-up.


I am happy with the results.  Feel free to comment or add your opinions of how you would have tackled a similar challenge.  Also, watch for a new downloadable Fashion Leaflet describing how to modify your SFD bodice blueprint to achieve this jacket.  I hope to have that available for your soon.

Kindly,
Glenda...the Good Stitch!

P.S. Although this next jacket isn't quite the same (nor is it a Sure-Fit Designs jacket), when I saw it on Imogene Lamport from Inside Out Style - I thought it was so similar in design with the exposed zipper offset on one side, that I wanted to show it to you.  And what a difference it makes to sew it in white for a summery look...also notice the shorter hip length...more like the NYC jacket in white and black.
 
luvne.com resepkuekeringku.com desainrumahnya.com yayasanbabysitterku.com