Tampilkan postingan dengan label Pants Kit. Tampilkan semua postingan

Adapting and Drawing the Pants Front Waist/Crotch Grid for a Thick Waist and a Relatively Short Front Crotch Length

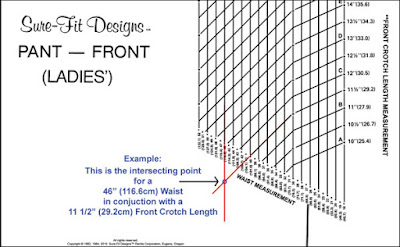
If you have a fairly short front crotch length measurement and you have a relatively thick waist, when drawing the pants pattern, you may find that your numbers 'fall off the Master Pattern Grid lines'.  This situation may occur when you are establishing the intersecting point for your waist measurement and front crotch length measurement on the Pants Front Waist/Crotch Grid.  In other words, the grid lines stop before your two numbers of waist measurement and front crotch length measurement have a chance to intersect.  These photos show and example of the type of body shape where this may occur.
 If this occurs, simply extend your appropriate grid lines straight down.  The waist measurement line (attached to your waist measurement number) will be drawn straight down.  The front crotch length measurement number will be extended downward but continuing on in its current angle and slope.

See the example diagram below where the person's waist measurement is 46" (116.6cm) and the front crotch length is 11 1/2" (29.2 cm).  Note how these lines have been extended and shown in continuous RED lines.  The BLUE dot represents where the two lines intersect.  This is where you would mark your placement dot for your CF waist measurement.  This dot, of course, would then connect (in either a straight or curved line) to your front side waist measurement dot.  And you would then continue to proceed to mark in your Dart tip and then your Front Crotch Pt. #1 and Pt. #2.  These steps are found in your Pants Kit instruction book, page 9, steps 9 and 10.

 Fine Tuning Your Pattern's Crotch Lengths - if Necessary
Once you have drawn your Back and Front Crotch lengths, also make sure you measure the finished lengths.  Since you are measuring a curve, remember to stand the tape measure on edge and walk the tape around the stitching line to ensure accurate length measurements.  The instructions and illustrations for this step are found in your Pants Kit instruction book on page 10, #13 - Fine Tuning Crotch Lengths.

Glenda...the Good Stitch!

Removing Horizontal Fold Under the Tummy

Some women experience horizontal fullness or bagging directly beneath their tummy and just before the crotch curve begins.  Once you've sewn your test muslin for your pants, if this is occurring, you will find one suggestion for a minor tune-up on page 12 (#1) of the Pants Kit Instruction Book.  This may be a satisfactory refinement for you.


Another alternative is to remove this fold of fabric at CF. Follow these directions:
1.  To determine how much you need to remove, pinch out the fabric in a tiny fold.  If you pinch out 1/4" (.6cm), this will mean that you will be totally removing 1/2" (1.3cm).


Close-Up of dart/tuck wedge from CF going to nothing at the side seams.


2.  Mark this level location of CF of the crotch seam.  Draw a perpendicular line (to the grainline) over to the side seam.  Mark point A and B.


3.  Cut from CF to side seam, leaving a small hinge of paper at the side seam. This will act as a pivot point.  Secure the pivot point with plastic tape.


4.  Overlap the CF seam the amount you require, thereby crating a small horizontal dart or tuck which begins at CF and goes to nothing at the side seam.

5.  True the CF crotch seam.

6.  The more you overlap at CF, the more the waist edge tilts down and angles the CF seam.  To maintain the original orientation of the upper CF seam, when you true the crotch seam, you will be crating a narrow wedge as indicated by the green arrow.  (The blue line indicates where CF at the waist edge originated).


7.  Cut/remove this narrow wedge and tape it back in place at the side seam waist edge.  This will maintain the correct waist circumference and true the side seam shape so that it will sew in the same curve to the back side seam.


8.  Redraw and reposition the front hip-fitting dart to best suit your body contours.

9.  Bring the straight of grain up from the leg.


This process will shorten the CF crotch length by the amount of the dart/tuck.  Be aware that you may need to add this amount on to the back crotch length so that you maintain your overall crotch length requirement.

Happy Sewing!

Glenda... The Good Stitch


Dealing with an Asymmetrical Body

Do you have asymmetrical body issues?  Very few people are truly perfect and symmetrical from one side to the other of their bodies.  Often a leg is slightly longer, or a shoulder might be sloped more than the other.

Ask yourself these questions:
1. How severe is the asymmetry?
2. Does it affect the look of my clothes on my body?
3. Should I make the effort to change my pattern?

If there are just slight differences from one side to the other, generally we do nothing, as it's simply not enough difference to affect the hang of the garment on our body.

However, if your garments hang crooked or form obvious drag lines toward the high or low point, then you will likely want to make asymmetrical adjustments to your pattern.

This typically entails creating a right and left side pattern that reflect the height and width dimensions for that part of your body.  Once the change is done for both sides (if necessary), they will generally then need to meet in the middle - typically CF and/or CB.  Once you've created a right and left side for your pattern and you're happy with the muslin test fitting shell, then you can use this pattern for future style changes.

You will always need to mark which is right and left side, and which side is going to be cut 'right side up'.  It's definitely more effort, but well worth it when your clothes hang better on your body.

In some instances, like a high/low shoulder, sometimes you can get away with a temporary solution of adding a shoulder pad to the low side.  This then will give you a more balanced look, particularly in jacket construction, and offers and easy solution.  Always try to evaluate your options before doing major pattern adjustments.

You will find asymmetrical high/low hip adjustment directions on page 17 of the Dress Kit Instruction Book.  The same basic concept applies to the waist line level of your pants pattern.  If you'd like to see a short video regarding the asymmetrical hip heights, watch this video:


Often times, you will also need to make circumference tune-ups as well since one side can be wider as well as longer.  Then you definitely need to create a right and left side pattern - for both the front and back of your skirt or pants.

Here's and example of pants that are now hanging fairly well on a definite asymmetrical body.  The waist line is substantially tipped forward and the right buttock is definitely higher and fuller than the left.  With persistence, and the creation of right and left side patterns for both front and back, these pants are now hanging smoothly.

Here are the happy customer's comments:

I finally have a great fitting pair of pants, thanks to the Sure-Fit Design system and the incredible assistance I received from Glenda.  In my opinion, she is the star of the system!  My original draft was easy to develop and certainly fit me better than any " straight from the envelope" pattern I've ever tried.  But my "great fit" is entirely the result of endless patience and guidance from Glenda, addressing my severely tilted waist, uneven hips and various other figure issues.  Over the course of about three weeks, we exchanged many emails working through all of the problems.  Her service is exemplary, and I highly encourage anyone with problems fitting pants to give Sure-Fit Designs a try!
KK, Sew Fittingly You, Victor, NY 


Happy Sewing!

Glenda...The Good Stitch


Pants - Curving the Center Front Seam for the Protruding Tummy

As we age, many women develop a fuller tummy/stomach pouch.  Sometimes this is primarily at CF and immediately underneath the waist.  For other women, this rounding/fullness is not only under the waist, but it also spreads horizontally.

When you have this little belly/pouch, you will often experience fullness in the CF seam right underneath the pouch.

However, sometimes it fits just fine under the pouch, but you'll see drag lines/wrinkles pointing up toward the center of the tummy fullness.  If this occurs, then consider this CF crotch seam refinement.

Rather than maintaining CF as a 'straight line', it can be slightly curved right where the tummy fullness is located.


The result is that:
1.  You wouldn't be able to put in a zipper fly at CF - since you need a straight seam for this application.  But a zipper front might not suit your body shape anyway because of the tummy pouch.

2.  With a curved CF seam, you wouldn't want to sew with a stripe or checked fabric, as you'd end up with a 'chevron' effect at CF which likely wouldn't be that flattering.  Choose solid colors.

This added curvature doesn't need to be a lot to make a substantial difference.  So even though this refinement might sound a little strange, it really does work.

Here's a photo of a happy seamstress, as these are the best fitting pants she's ever worn.  In this photo, her blouse is tucked in to show the excellent pattern fit, but typically she only ever wears her blouses out over top of her pants.  This refinement really does work well!


Happy Fitting & Sewing!

Glenda...The Good Stitch

Double Back Darts

This topic of double darts at the pants waist edge is well worth repeating.  I just had to show you another example of how adding a second dart at the waist line of your pants pattern can really improve the fit.

If you go from a relatively small waist to quite full high hips, I highly recommend adding a second dart to the waist edge of your pants pattern.

This lady attended one of my recent Fit & Sew Retreats.  She has a pretty dominant swayed, dipped center back (at the waist edge), quite full low hip measurement and thin legs.

Here's the result:


She's always had difficulty getting any pants (or skirt for that matter) to fit.  That's why she attended the Retreat.

Keeping in mind these are test pants, where every wrinkle and nuance shows, you're seeing a near to perfect fit at the waist and in the hips and a beautiful hang on the leg.  From a side view you're seeing a perfectly straight side seam.  CF needed to be raised slightly, but that was refined in the tune-ups.

In the above close-up, you're seeing the position of the 2 waist-fitting darts.  They shape her hip shape well.

She did a great job of drafting her pattern and the results as so worth her effort.  Well done...and great fit!

To see how to add this second waist-fitting dart, please watch this short video tutorial.


For any of you ladies who might fall into this category, you'll want to give this a try.

Kindly,
Glenda...the Good Stitch!

Comfortable Culottes

Yes, that's right, culottes are back.  Some never really stopped wearing them, simply because they are so comfortable, but now they are officially back.

 I first read this article in the Style & Travel section of the Wall Street Journal (by Cheryl Lu-Lien Tan), but in doing research about culottes and their comeback, my guess is that it's appeared in other publications.  She says that they're back in a big way for the first time since the 1980's.  You all know that if we wait long enough, the fashion cycle just goes round and round.

This style typically features a  wide, and often voluminous leg that extends from a cinched waistline.  The hem can be anywhere from an inch below the knee to a couple of inches above the ankle.  What makes them so comfortable is that for a really good fit that doesn't bind and pull in the crotch, the crotch point needs to be dropped and extended.  The hang of the leg improves, they won't crawl up between your thighs, and they can give the look of a drapy skirt.

The photo below shows culottes that I designed and sewed for an article featured in Dressmaking with Stitches (an Australian publication).  Of course, the cross-over wrap blouse is also an SFD creation designed and sewn from the Dress Kit.
What to consider when wearing culottes?  Well obviously your height and shape make a difference.  Here are 5 tips that I'll share with you from the article.
  • Shorter women will no doubt need heels (shoes or boots) with culottes; taller ladies can wear flats, sandals or fancy sneakers.
  • Keep the top slimmed down if you have particularly voluminous legs.
  • For evening wear, choose a dressier fabric like silk, or drapy polyesters.
  • High-waisted culottes are the most flattering; low-waisted versions can make you look short legged.
  • For fall and winter, turtlenecks and knee-high boots work best.
  • Steer clear of fabrics that are too stretchy or clingy (such as jersey).


Here's a few of the featured culottes and though I'm not excited about the ones with the hemline boarder trim, they do show you alternative examples.


From InsideOutStyleBlog.com (Imogen Lamport) (who I've recommended many times for dressing for your body shape), she's just written a recent blog on how to dress and accessorize when wearing culottes.  Make sure you take a look at her blog since she offers lots of great photos and excellent accessorizing alternatives. (PS - I should also mention that Sure-Fit Designs is not associated with InsideOutStyleBlog in an way either for personal or business relationships.  I simply happen to believe that Imogen does an excellent job of all the information she presents on her blog).


And, aren't we lucky that with SFD, we don't have to rely on ill-fitting ready-to-wear.  We can sew our own and know they'll fit properly.  Fashion Leaflet #2 gives you all the details you need to design your own from your SFD Pants pattern.  Click Here.
You can choose this version with a 'gaucho' style of leg treatment, or the directions will also tell you how to add a pleat that drapes directly out of center front.  Either way, you win with comfort and fashion.

Kindly,
Glenda...the Good Stitch!


Best Pants Styles for your Body Shape

I've recommended InsideOutStyle blog to you a couple of times...and here is a good reason why.  When you're looking for information on what styles look best on your body shape, Imogene Lamport, from InsideOutStyle, is the lady to ask.
 Here's a great and very informative chart on how to recognize what your body shape is and what style of pants would suit you best.
If you'd like to read more about how to analyze your shape, please click through to this page.
And from there, you know how easy it is to get the best fit possible when drawing and designing it yourself from your SFD pants body blueprint.

Aren't you glad you don't have to rely on ready-to-wear to supply you with well-fitting clothing?

Kindly,
Glenda...the Good Stitch!

Sew...What's New?

Introducing the 2015 Face-Lift!
Many of you have asked what's new in 2015 editions of the Sure-Fit Designs Kits.  First, please rest assured, that with the exception of the Shirt Kit Master Patterns, all of your other Master Patterns in the Dress, Pants and Children's Kits have NOT changed.  They are still the same great-fitting patterns we've offered you over the years.

So let's take a look at what is different.  First, we've gone to a full-color envelop for packaging all the Kits.
DRESS KIT
The Dress Kit Instruction book is now the 6th edition.  Within this instruction book, all of the technical art, that is how to draw off these master patterns to create your body blueprint, has all been updated for even greater clarity.  One new fashion design instruction for the 'S'-curved neckline blouse was added.  Due to expanded technical illustrations and the new design, the book went from 52 to 56 pages.

The Master Patterns and Dress Kit templates have NOT changed.

If you want to purchase just the 6th edition Dress Kit Instruction book, please click here.


PANTS KIT
The Pants Kit Instruction book is now the 5th edition.  Within this instruction book, all of the technical art, that is how to draw off these master patterns to create your body blueprint, has all been updated for even greater clarity.

The Pants Master Patterns have NOT changed.

If you want to purchase just the 5th edition Pants Kit Instruction book, please click here.


SHIRT KIT
The entire 5th edition Shirt Kit has changed substantially.  The Master Patterns are totally updated - meaning they no longer have seam allowances on them.  They are now consistent with all the other SFD Master Patterns, where once you have drawn your body blueprint pattern, you will now ADD the 5/8" (1.6 cm) allowance.  The Shirt Kit accessory pieces now include a flat collar and woman's cuff along with all the other collar and pocket shapes.  The instruction book, by necessity, has all new technical drawings showing exactly how to draw these new master patterns.  All the fashion art has been totally updated and offers new designing suggestions.  The book has gone from 20 to 28 pages.

If you want to purchase the 5th edition Shirt Kit, please click here.

CHILDREN'S KIT
The Children's Kit Instruction book is now the 5th edition.  Within this instruction book, all of the technical art, that is how to draw off these master patterns to create your body blueprint, has all been updated for even greater clarity.  All of the fashion art has changed and been updated.  There are a lot of fun, new ideas for sewing children's clothing.  The book has gone from 32 to 36 pages.

The Children's Master Patterns have NOT changed.

If you want to purchase just the 5th edition Children's Kit Instruction book, please click here.


MEN'S PANTS INSTRUCTIONAL PACKAGE
The Men's Pants Instructional package is now the 5th edition.  Within this instruction book, all of the technical art, that is how to draw off these master patterns to create your body blueprint, has all been updated for even greater clarity.  The fashion art has changed and been updated.  The Men's Pants instructions have always utilized the ladies' Pants Kit Master Patterns as the basis for drawing the men's pants.  Nothing has changed in that regard.

If you want to purchase the 5th edition Men's Pants Instructional Package, please click here.


HOW-TO DVD
Finally, the Sure-Fit Designs introductory DVD has been updated.   This DVD offers the basics for getting started wth the Sure-Fit Designs system of pattern fitting and designing.
It consists of 2 DVD's and offers 3hr 45min of clear, concise instruction for drawing the Dress, Pants, Shirt and now includes drawing off all patterns in the Children's Kit.  Additionally you'll see how to measure for the man's pants as well as a discussion on drawing the pattern.  If you want to purchase just the new How-To DVD, please click here.

Limited Time 'Bundle' Special
If you are interested in updating your SFD kits/supplies, we're offering a Limited Time Special for all of the above itemsReceive a 15% discount when each of the above are ordered in a 'Bundle'.  Please Click Here.

Let's take a look at some of the new design ideas and fashion art in both the Children's and Shirt Kit.


(Sorry the art isn't all laid out evenly.  I have a dickens of a time with blogger getting things positioned where I'd like them to be.)

I hope you all will enjoy the new SFD look and instruction books.

As always, I thank you for your ongoing support.
Kindly,
Glenda...the Good Stitch! 
luvne.com resepkuekeringku.com desainrumahnya.com yayasanbabysitterku.com