Tampilkan postingan dengan label Pockets. Tampilkan semua postingan

Easy Front Inset Pocket in a Stretch-Woven Cropped Pant

I was given a remnant of fabric - just enough to sew a pair of cropped pants with an easy front inset pocket.  Since it was a stretch-woven, I did size down my body blueprint 1 measurement dot.  This seemed like enough at the time, but as can happen with stretch knits and stretch-woven fabric, I still basted the seams first - did a try-on - and ended up slimming the hip line even a little more.  You just never know how much it's going to give and how it's going to feel on your body.

Always do a stretch test by picking up 10" on the crosswise grain and stretch it comfortably.  This stretched up to 13" meaning it's a moderate stretch knit.  It should only need to be sized down one dot, but what this doesn't account for is the fabric's ability to rebound or recover.  This particular piece didn't have great recovery.

Now on to the easy inset pocket in the pants front.  The upper and under pocket is all one piece of fabric.

Then you fold the pocket lining - in this case - the beige fabric - up so that the lower cut edge meets back up at the waistline.


If you'd made the pocket lining out of the same fashion fabric, then you would not need to face the 'under' pocket.  But that's not always suitable or practical if the fashion fabric is too heavy.  In this instance, the next step was to cut a shaped facing piece and sew it on to the right side of the waist edge of the under pocket lining.


You can also see that the inside edge(s) of the pocket bag have been sewn/serged together.  (Likely best to sew the topstitching on the pocket opening before sewing this inside bag seam).


Topstitch the pocket opening if you wish.  Then with the pocket in position, baste through the pocket bag and the side seam and the upper pocket edge to the pants front at the waist edge to hold it in place during the remainder of the construction steps.

This very easy pocket designing and sewing technique is found on page 22 & 23 of your Sure-Fit Designs Pants Kit Instruction Book. It's a Jeans style of pocket without the fuss of a separate upper and under pocket.  If you haven't yet, try it to see just how easy it is.


Kindly,
Glenda...the Good Stitch!

Tying it all Together

Sometimes it's difficult for some of you to visualize taking an idea from 'here' and mixing it with an instruction from 'there', then adding a little something extra from 'where'. As so many of you know, the Sure-Fit Designs system is not just a fitting system. It also offers all kinds of written instructions and video information on not just fitting, but on designing with your body blueprint (sloper) once you have it completed.

For those of you who follow this Sure-Fit Designs blog, you know that the last few blogs have been on pocket types, applications and sewing technique. As I was preparing the sample photos on drawing and stitching the double welt pocket, I also happened to be at our local JoAnn's (and almost one and only fabric store in Eugene, Or) I came across this novelty stretch bottom weight. I loved it immediately and thought of pants with a welt pocket in the back.

Next step was tying it all together. What style of pants did I want? Since the fabric had about 3 - 4% Spandex, even though it was a woven fabric, I knew it would give when wearing. Skinny came to mind. Jeans came to mind. But I didn't want traditional jeans with the fly front and typical pockets. I wanted to show you the welt pocket.

Here's what I tied together:

My jeans pattern - since wearing ease had already been removed. (Jeans: Behind the Scenes on DVD)

Style #1 - Flared Leg Pants - Elasticized Waist edge from Pants that Mix n Multiply. Though I didn't want flared legs. I wanted skinny all the way to the hem. What I wanted was the side seam invisible zipper and the elastic turned over waist edge.

Blog instructions for the Double Welt Pocket (from last week).

Now for the finished photos:

The double welt pocket.


The invisible zipper and elastic waist edge.


The finished ensemble:

Brown/black leopard-skin patterned fabric for the pants. I guess they could have been tighter but considering I never wear anything skin tight they suited my preferences...and they're totally comfortable. The blouse and jacket is from the SFD Shirt Kit pattern. The blouse has a shawl collar. You'll find directions for this collar on page 44 of the Dress Kit Instruction book. The jacket has a lapel collar and is sewn from a cotton chintz. I love this classic jacket! I've worn it for years and it still looks fine. That's one thing about choosing classic designs - good, bad or boring... they go forever. Remember Chanel...the Chanel jacket...they're still selling it...and you're still sewing it. Yeah!!! for classic designs.
Kindly,
Glenda
PS. I'm going to sew another top for these pants.  I've got the fabric.  It's a really nice cool (colored) brown sport knit.  Now I just need to find the time!

Next installment...I found the time to design and sew the Asymmetrical Pleated T-Shirt from the SFD Shirt Kit.  The directions for this comfy T-Shirt are found in the downloadable Fashion LeafletsClick Here if you're interested.


The Double Welt Pocket

The welt part of a welt pocket is the narrow strip of fabric that forms the decorative and functional upper and lower lip of the opening for the pocket. Welt pockets can have a single or a double welt lip. These directions will be for a double welt. As with many construction techniques, there are many different ways to do most jobs. This is just one way that seems to works well.

Though there will be a pocket bag inside, the finished double welt pocket looks very much like a large bound buttonhole.

1. Mark pocket position on right side of fabric with your choice of marking method - tailor's chalk, tracing carbon or machine basting would work.

2. Cut the welt strips 1" (2.5 cm) wide for a finished 1/4" (6 mm) wide welt and at least 2" (5.1 cm) longer than the desired pocket opening.


3. Fold welt in half, raw/cut edges together. Place the welt on the right side of the garment. Place the fold of the welt toward the outside and the cut edge is on marked pocket position.


4. Stitch down the middle of each welt. Backstitch at both ends. Lines of stitching must be perfectly straight and parallel. If they're not, this won't turn out properly - start again!


5. Cut the pocket opening. Cut down the middle stopping ½” – ¾” (1.3-1.9 cm) before end of pocket. Clip diagonally to backstitched points. Keep diagonal triangle longer, it’s easier to work with. 

6. Turn welts toward inside, carefully press. The welts should just fill the opening with the folded edge of the welts just touching one another.

7. Inside pocket bag - cut the pocket bag the width of the welt plus double the depth you want the pocket to be.

8. On the inside, begin by stitching the (upper) edge of the pocket bag to the cut/raw edge of the top welt. With right sides together, begin on the welt extension, then as you stitch, you'll also sew through the fashion fabric on exactly the previous stitching. Be careful not to catch the triangle in this stitching.

9. a) Fold so that the lower welt is positioned to expose the cut edge of the welt and the bag is "down".

9. b) Then fold the remaining edge pocket bag up to meet the cut edge of the welt thereby covering up the pocket opening hole. Flip over so that you can see where to stitch, then sew beginning on the welt extension through the fashion fabric toward the other end.


10. Fold the fashion fabric back to expose the welt extension and the triangular wedge tab. Stitch across the triangle flush to the body of the garment, stitching through the welt extensions and pocket bag.

11. Trim pocket bag width as desired. Then sew sides of pocket bag together including welt extensions.  

If you've never sewn a double welt pocket, I highly recommend creating a sample from fabric that is lightweight, yet has a relatively crisp 'hand' so that when you press the fold in the welts and when you turn the welts to the inside they will press nice and flat.


Inseam Pockets (Almost Invisible)

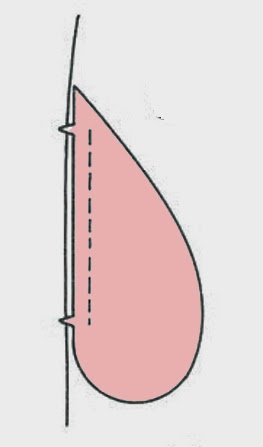
If you check out your Sure-Fit Designs Pants Kit Master Patterns (Pants Back), you'll see a 'tear-drop' shaped Inseam Pocket pattern.


1. Copy the pattern on your tracing vellum. You don't need to add seam allowances since this particular pattern piece already has them incorporated.

2. On both the front and back pants patterns, mark the corresponding front and back side seam notches approximately 2" (5.1 cm) and 9" (23 cm) down from the waist edge on the side seam.

3. Sew one inseam pocket to the pants front side seam, and the other pocket piece to the pants back side seam between the notches as illustrated. Clip the seam allowance to the upper and lower notches.


4. Sew the front and back pants side seam together from the hem up to the lower pocket notch. Skip the pocket opening and then continue sewing from the upper notch to the waist edge.

5. With right sides together, sew the pocket pieces together around the curved edge.


For more pocket stability, the top of the pocket can be squared off and lengthened so that it could totally be sewn in to the waist edge. This of course, would be done during step 1 - the drawing stage.

Suited to be incorporated in either skirts of pants, these inseam pockets are simple and easy to draw and sew.


Self-faced Patch Pocket

As I’ve previously commented, pockets can be decorative, functional or decorative and functional. In this blog, I’ll deal with the patch pocket. These directions focus on functionality and construction of the self-faced patch pocket.
As a general rule, patch pocket dimensions are the size of your hand plus ¾” – 1 ½” (2-4cm) all around for ease.


After cutting the pocket of your desired shape and fabric, mark the hem fold line either with a fabric marking pen or by clipping on either side of the hem line.


Finish upper edge of pocket.


For pockets with rounded corners, ease stitch (baste) the curved edges 3\8” (1 cm) from raw edges and notch the seam allowance around the curved edge.


With right sides together, fold the hem to the outside along the fold line. Stitch ends. Trim seams.


Turn upper edge and seam allowances to inside, pressing in place. For pointed corners, fold corners diagonally. For rounded corners, pull ease stitches to ease fullness, notch curves if you have not already done so. Press.


If desired, topstitch or use a decorative stitch along top edge of pocket before applying to garment or leave plain.

Place pocket on garment matching placement lines and markings. Edgestitch or topstitch pocket in place, leaving top edge open.


Tip: To hold pocket in place while sewing, us a thin strip of lightweight fusible webbing. Place it under the sides and bottom edge of the pocket and gently press to secure it.


Pick Your Pocket!


(My apology...I'd give credit to the original source for this cute sketch, but can't find a reference.  
If anyone knows, I'd be happy to give full credit to the illustrator.)

What would we do without pockets? Any time I design anything without a pocket, I know I'll usually regret it. They're a storage and carrying facility for tissues, keys, cell phones, important notes (that we simply can't lose) and all kinds of other important odds and ends. They can be both decorative and functional – pockets serve both purposes. Personally, I don't like pockets that are purely decorative. They're deceiving - you think you've got that receptacle, but alas it goes nowhere. My philosophy is, if you're going to the effort to design, sew and decorate it, you may as well be able to use it. And when it is functional, I like the inner bag deep enough that those important 'things' won't fall out of it.

Depending on the fabric, garment style and intended purpose, they can lend a look to your garment that is either casual or professional.

There are two main types of pockets: Patch pockets and Bag or “inside” pockets.

And within each category there are a number of variations and alternatives. We’ll take a look at a few of these options.

1. Patch pockets are typically a shaped piece of fabric, finished on all sides, and applied to the right side of a garment. The size and shape of the pocket depends entirely on the look and function you desire. Patch pockets are commonly found on:
Shirts/tops/blouses/jackets at chest level
Jackets at hip level
Front and back of pants


  • 2. Bag pockets, also known as “inside” or “inseam” pockets are sewn on the inside of the garment with access on the outside. In general they are designed to be hidden from view. They can be cut out as part of the garment (lightweight fabrics) or attached to the seam allowance of side seams (heavy fabrics).

    Within the bag pocket category, there are three common bag pockets.
    a. Inseam pocket – means it is not visible from the right side of the garment.

    Inseam pockets are typically located on skirts and pants at hip level and along the side seams on coats and jackets. 


    b. Wedge or slant angle pocket – where the under pocket is exposed on the right side of the garments. The actual slant or angle of the wedge can take on many different 'angles' and can also have a gentle curve for the opening.


    c. Welt pocket – This type of pocket is made by slashing the fabric in the desired pocket location and adding the pocket bag to the inside of the garment. The slashed opening is finished or bound similar to a bound buttonhole.
    Or you can insert a zipper as shown in the following illustration.


    In the next installment, we look at each type of pocket more closely and how to design and sew it together.


luvne.com resepkuekeringku.com desainrumahnya.com yayasanbabysitterku.com