Tampilkan postingan dengan label Sewing Techniques. Tampilkan semua postingan

Zipper Scratchies!

Protect yourself from those darn 'zipper scratchies'!

Sometimes when wearing a garment with an invisible zipper, the end of it - where the zipper stops - can be rough and scratchy.  Here's a quick tip on how to cover that end before you insert the zipper.

1. Use a soft, yet dense enough strip of fabric like cotton interlock.  Cut the strip 1" (2.5 cm) by about 2 1/4" (5.8 cm) wide.
2.  Lay this strip on the right side of the zipper tape with the cut edge almost on the end of the zipper.  Stitch directly beneath the zipper stop across the width of the zipper.

 3.  Trim some of the strip to remove excess bulk.

 4.  Fold the fabric strip around to the wrong side of the zipper wrapping/enclosing the ends of the zipper tape.

5.  Then from the right side, stitch in the ditch, sewing through all layers to secure it in position.


6.  Proceed with the normal application instructions to insert an invisible zipper.

...And on the inside, it looks like this...

This soft, little piece of fabric protects you from the 'zipper scratchies'.  It's a quick little technique.  Give it a try the next time you apply an invisible zipper.

Kindly,
Glenda...the Good Stitch!


Squishy, Spongy, Stretchy!

Topstitching a fabric that is squishy, spongy and stretchy is no fun!  And on top of that, the fabric I was using was a leather-like stretch, which meant once the needle pierced the fabric, it left distinctive holes.  And on top of this, the fabric would not press flat, which made it very difficult when turning and pressing seams.  No second chances on this project!

Here's what the finished jacket looks like.


It's a Sure-Fit Designs knock-off of a jacket I saw in NYC.  Exposed zippers are ever so popular.
Mine of course, being all black, doesn't have quite the bizazz appeal like the black & white ready-to-wear, but it's still a stunning jacket.  And the SFD version does have a shoulder yoke - just not as deep in toward the armscye area.

This blog is going to focus only on the topstitching process and tips that I'd like to share with you if you ever come across this type of situation.  Since I knew I had one chance only to get it right, meaning evenly spaced, straight, no skipped stitches and no puckers, testing prior to the final topstitching was definitely required.

Yup!  This fabric is great to look at, but it sure did have it's challenges.  It just simply wouldn't feed well when the leathery side is face up.  I'd purchased both a solid black as well as a perforated patterned piece.  I got them both in the Stretch House during my NYC excursion.

I combined both these fabrics in this jacket.  With a traditional seam, if right sides were being sewn together, it wasn't a problem, but if you needed to topstitch...well - watch out!  It has kind of a leather-like look and a little bit of a sticky feel.

The feed dogs didn't like it.  The walking foot didn't help feed the under and upper layers equally.  Perhaps a roller foot would have worked, but since I didn't have that machine attachment another solution needed to be found.

After much testing, I settled on a paper-like tear-away stabilizer.  I had 3 different ones to test and ended up using this Sulky Tear-Away.  It's years old and I'm sure the price is more than  $1.99 now, but for this project, it worked the best.
What did I test before sewing the one and only chance I was going to get?
First, I recreated a seam scenario as close to what the finished jacket had - meaning the solid black fabric was on the underside of the lapel.  The perforated fabric was on the top side.
Then I tested:
  • the best needle choice to prevent skipped stitches.  Of course, new is always preferable.
  • stitch length - what would look the best on the finished edge.
  • which stabilizer tore away the easiest without too much pulling and stress on the stitches.

This is just a photo of the test sample.  I did about 3 different swatches.


After choosing the most appropriate stitch length, best needle and stabilizer, I prepared the stabilizer.  It had to be cut in the exact shape of the neck line curve so that I could lay it in place and see the folded edge of the seam.  I used the pattern's neck edge for this.


Then I took a deep breath, centered my thoughts and began topstitching.  Remember, I had only one chance at this - this fabric was so unforgiving that I couldn't pick it out if I happened to sew crooked.


Here's a close-up of the stitching before the stabilizer was torn away.


Next came tearing the stabilizer away.  Even this needed to be done with control - one side at a time for both the upper and under layers.


When it was all said and done, I was quite happy with the results, but I'd been agonizing over this final process for the last few days, knowing that it was one chance or the whole thing would be ruined.

Here's a close-up.


I am happy with the results.  Feel free to comment or add your opinions of how you would have tackled a similar challenge.  Also, watch for a new downloadable Fashion Leaflet describing how to modify your SFD bodice blueprint to achieve this jacket.  I hope to have that available for your soon.

Kindly,
Glenda...the Good Stitch!

P.S. Although this next jacket isn't quite the same (nor is it a Sure-Fit Designs jacket), when I saw it on Imogene Lamport from Inside Out Style - I thought it was so similar in design with the exposed zipper offset on one side, that I wanted to show it to you.  And what a difference it makes to sew it in white for a summery look...also notice the shorter hip length...more like the NYC jacket in white and black.
 

Easy Front Inset Pocket in a Stretch-Woven Cropped Pant

I was given a remnant of fabric - just enough to sew a pair of cropped pants with an easy front inset pocket.  Since it was a stretch-woven, I did size down my body blueprint 1 measurement dot.  This seemed like enough at the time, but as can happen with stretch knits and stretch-woven fabric, I still basted the seams first - did a try-on - and ended up slimming the hip line even a little more.  You just never know how much it's going to give and how it's going to feel on your body.

Always do a stretch test by picking up 10" on the crosswise grain and stretch it comfortably.  This stretched up to 13" meaning it's a moderate stretch knit.  It should only need to be sized down one dot, but what this doesn't account for is the fabric's ability to rebound or recover.  This particular piece didn't have great recovery.
Now on to the easy inset pocket in the pants front.  The upper and under pocket is all one piece of fabric.

Then you fold the pocket lining - in this case - the beige fabric - up so that the lower cut edge meets back up at the waistline.


If you'd made the pocket lining out of the same fashion fabric, then you would not need to face the 'under' pocket.  But that's not always suitable or practical if the fashion fabric is too heavy.  In this instance, the next step was to cut a shaped facing piece and sew it on to the right side of the waist edge of the under pocket lining.


You can also see that the inside edge(s) of the pocket bag have been sewn/serged together.  (Likely best to sew the topstitching on the pocket opening before sewing this inside bag seam).


Topstitch the pocket opening if you wish.  Then with the pocket in position, baste through the pocket bag and the side seam and the upper pocket edge to the pants front at the waist edge to hold it in place during the remainder of the construction steps.

This very easy pocket designing and sewing technique is found on page 22 & 23 of your Sure-Fit Designs Pants Kit Instruction Book. It's a Jeans style of pocket without the fuss of a separate upper and under pocket.  If you haven't yet, try it to see just how easy it is.


Kindly,
Glenda...the Good Stitch!

Just a Reminder...

Many of you ask for help. And all of you know, or should know by now, that I am more than willing to offer input, suggestions and solutions for whatever your issue happens to be.

But...I do need to remind you that sometimes your verbal description of what is going on can be 'Greek' to me. You all know how it is so easy to mis-interpret what someone has written.

A picture really is worth a thousand words.

What am I talking about??? When you ask for help via email, please include a photo (or photos) of whatever your question is about. That way I have a better opportunity to evaluate your situation, figure out what you've done (some times I can...some times I can't) and offer suggestions.

There is a page on our websites dedicated entirely to our Customer Support. If you haven't yet run across this page, please click here - Customer Support.

If your question happens to be about the fit of your body blueprint, please make sure you have watched this video first.

Even though I'm demonstrating on a Pants pattern, the same concepts and general cautions also apply to all the Sure-Fit Designs master patterns. How you've drawn your pattern is extremely important.

In my fitting classes, I see all kinds of ways and attitudes about what someone thinks is accurate and how fastidious they are in taking care that the dots and connecting lines are accurate....and then I see others who also think the same thing, but the pattern reflects less attention to detail. This same lack of attention to detail is often reflected in their sewing technique, which of course can change the finished result. Please take your time. So many of you know that the pattern drawing process is truly easy to do and doesn't take much time, but you also know that attention to detail will affect the resulting fit.

And, if you are wondering about a particular style or design or process and wondering where the information is found within the Sure-Fit Designs system, please, please, please download this free Sure-Fit Designs INDEX (which was compiled by Sara Gray - a SFD customer).


Just go to FREE STUFF and scroll down the page. You'll see it. Sara did a remarkable job of indexing where all the information is found within the SFD fitting system materials. It's easy to read and easy to find what you're looking for. Please look here first. Then if you can't find what you're seeking, email me for help.

And last, but certainly not least, if you are wanting help with fitting suggestions or how to design something, you might likely just find the answer in the SFD Video Library - http://www.sfdlearningcenter.com/Video_Library.html or in the Article Library http://www.sfdlearningcenter.com/Article_Library.html

Each month I try to add at least one more video or one more article. I don't always have time to announce these in the newsletter (or anywhere else for that matter). But it really is worth your time to check back to these resources regularly to see if anything is new.

Thanks so much for continuing to be a loyal Sure-Fit Designs user and customer. I truly do enjoy hearing from you.


Kindly,

Glenda

Inseam Pockets (Almost Invisible)

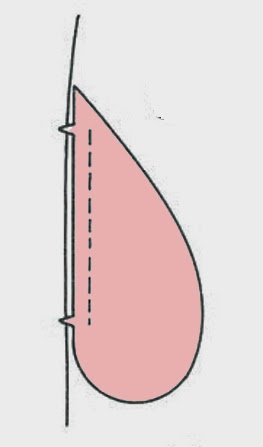
If you check out your Sure-Fit Designs Pants Kit Master Patterns (Pants Back), you'll see a 'tear-drop' shaped Inseam Pocket pattern.


1. Copy the pattern on your tracing vellum. You don't need to add seam allowances since this particular pattern piece already has them incorporated.

2. On both the front and back pants patterns, mark the corresponding front and back side seam notches approximately 2" (5.1 cm) and 9" (23 cm) down from the waist edge on the side seam.

3. Sew one inseam pocket to the pants front side seam, and the other pocket piece to the pants back side seam between the notches as illustrated. Clip the seam allowance to the upper and lower notches.


4. Sew the front and back pants side seam together from the hem up to the lower pocket notch. Skip the pocket opening and then continue sewing from the upper notch to the waist edge.

5. With right sides together, sew the pocket pieces together around the curved edge.


For more pocket stability, the top of the pocket can be squared off and lengthened so that it could totally be sewn in to the waist edge. This of course, would be done during step 1 - the drawing stage.

Suited to be incorporated in either skirts of pants, these inseam pockets are simple and easy to draw and sew.


Pick Your Pocket!


(My apology...I'd give credit to the original source for this cute sketch, but can't find a reference.  
If anyone knows, I'd be happy to give full credit to the illustrator.)

What would we do without pockets? Any time I design anything without a pocket, I know I'll usually regret it. They're a storage and carrying facility for tissues, keys, cell phones, important notes (that we simply can't lose) and all kinds of other important odds and ends. They can be both decorative and functional – pockets serve both purposes. Personally, I don't like pockets that are purely decorative. They're deceiving - you think you've got that receptacle, but alas it goes nowhere. My philosophy is, if you're going to the effort to design, sew and decorate it, you may as well be able to use it. And when it is functional, I like the inner bag deep enough that those important 'things' won't fall out of it.

Depending on the fabric, garment style and intended purpose, they can lend a look to your garment that is either casual or professional.

There are two main types of pockets: Patch pockets and Bag or “inside” pockets.

And within each category there are a number of variations and alternatives. We’ll take a look at a few of these options.

1. Patch pockets are typically a shaped piece of fabric, finished on all sides, and applied to the right side of a garment. The size and shape of the pocket depends entirely on the look and function you desire. Patch pockets are commonly found on:
Shirts/tops/blouses/jackets at chest level
Jackets at hip level
Front and back of pants


  • 2. Bag pockets, also known as “inside” or “inseam” pockets are sewn on the inside of the garment with access on the outside. In general they are designed to be hidden from view. They can be cut out as part of the garment (lightweight fabrics) or attached to the seam allowance of side seams (heavy fabrics).

    Within the bag pocket category, there are three common bag pockets.
    a. Inseam pocket – means it is not visible from the right side of the garment.

    Inseam pockets are typically located on skirts and pants at hip level and along the side seams on coats and jackets. 


    b. Wedge or slant angle pocket – where the under pocket is exposed on the right side of the garments. The actual slant or angle of the wedge can take on many different 'angles' and can also have a gentle curve for the opening.


    c. Welt pocket – This type of pocket is made by slashing the fabric in the desired pocket location and adding the pocket bag to the inside of the garment. The slashed opening is finished or bound similar to a bound buttonhole.
    Or you can insert a zipper as shown in the following illustration.


    In the next installment, we look at each type of pocket more closely and how to design and sew it together.


luvne.com resepkuekeringku.com desainrumahnya.com yayasanbabysitterku.com