Tampilkan postingan dengan label Pants Master Pattern. Tampilkan semua postingan

Adapting and Drawing the Pants Front Waist/Crotch Grid for a Thick Waist and a Relatively Short Front Crotch Length

If you have a fairly short front crotch length measurement and you have a relatively thick waist, when drawing the pants pattern, you may find that your numbers 'fall off the Master Pattern Grid lines'.  This situation may occur when you are establishing the intersecting point for your waist measurement and front crotch length measurement on the Pants Front Waist/Crotch Grid.  In other words, the grid lines stop before your two numbers of waist measurement and front crotch length measurement have a chance to intersect.  These photos show and example of the type of body shape where this may occur.
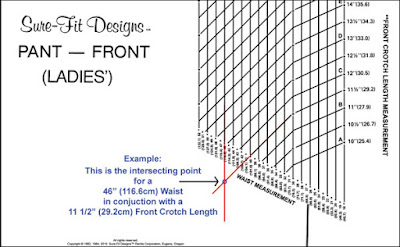
 If this occurs, simply extend your appropriate grid lines straight down.  The waist measurement line (attached to your waist measurement number) will be drawn straight down.  The front crotch length measurement number will be extended downward but continuing on in its current angle and slope.

See the example diagram below where the person's waist measurement is 46" (116.6cm) and the front crotch length is 11 1/2" (29.2 cm).  Note how these lines have been extended and shown in continuous RED lines.  The BLUE dot represents where the two lines intersect.  This is where you would mark your placement dot for your CF waist measurement.  This dot, of course, would then connect (in either a straight or curved line) to your front side waist measurement dot.  And you would then continue to proceed to mark in your Dart tip and then your Front Crotch Pt. #1 and Pt. #2.  These steps are found in your Pants Kit instruction book, page 9, steps 9 and 10.

 Fine Tuning Your Pattern's Crotch Lengths - if Necessary
Once you have drawn your Back and Front Crotch lengths, also make sure you measure the finished lengths.  Since you are measuring a curve, remember to stand the tape measure on edge and walk the tape around the stitching line to ensure accurate length measurements.  The instructions and illustrations for this step are found in your Pants Kit instruction book on page 10, #13 - Fine Tuning Crotch Lengths.

Glenda...the Good Stitch!

Comfortable Culottes

Yes, that's right, culottes are back.  Some never really stopped wearing them, simply because they are so comfortable, but now they are officially back.

 I first read this article in the Style & Travel section of the Wall Street Journal (by Cheryl Lu-Lien Tan), but in doing research about culottes and their comeback, my guess is that it's appeared in other publications.  She says that they're back in a big way for the first time since the 1980's.  You all know that if we wait long enough, the fashion cycle just goes round and round.

This style typically features a  wide, and often voluminous leg that extends from a cinched waistline.  The hem can be anywhere from an inch below the knee to a couple of inches above the ankle.  What makes them so comfortable is that for a really good fit that doesn't bind and pull in the crotch, the crotch point needs to be dropped and extended.  The hang of the leg improves, they won't crawl up between your thighs, and they can give the look of a drapy skirt.

The photo below shows culottes that I designed and sewed for an article featured in Dressmaking with Stitches (an Australian publication).  Of course, the cross-over wrap blouse is also an SFD creation designed and sewn from the Dress Kit.
What to consider when wearing culottes?  Well obviously your height and shape make a difference.  Here are 5 tips that I'll share with you from the article.
  • Shorter women will no doubt need heels (shoes or boots) with culottes; taller ladies can wear flats, sandals or fancy sneakers.
  • Keep the top slimmed down if you have particularly voluminous legs.
  • For evening wear, choose a dressier fabric like silk, or drapy polyesters.
  • High-waisted culottes are the most flattering; low-waisted versions can make you look short legged.
  • For fall and winter, turtlenecks and knee-high boots work best.
  • Steer clear of fabrics that are too stretchy or clingy (such as jersey).


Here's a few of the featured culottes and though I'm not excited about the ones with the hemline boarder trim, they do show you alternative examples.


From InsideOutStyleBlog.com (Imogen Lamport) (who I've recommended many times for dressing for your body shape), she's just written a recent blog on how to dress and accessorize when wearing culottes.  Make sure you take a look at her blog since she offers lots of great photos and excellent accessorizing alternatives. (PS - I should also mention that Sure-Fit Designs is not associated with InsideOutStyleBlog in an way either for personal or business relationships.  I simply happen to believe that Imogen does an excellent job of all the information she presents on her blog).


And, aren't we lucky that with SFD, we don't have to rely on ill-fitting ready-to-wear.  We can sew our own and know they'll fit properly.  Fashion Leaflet #2 gives you all the details you need to design your own from your SFD Pants pattern.  Click Here.
You can choose this version with a 'gaucho' style of leg treatment, or the directions will also tell you how to add a pleat that drapes directly out of center front.  Either way, you win with comfort and fashion.

Kindly,
Glenda...the Good Stitch!


A BIG Thank you!

  What's in the blog?

1. A big, big thank you!
2. Narrowing the Pants Leg
3. Your favorite sewing notion

A Great Big Thanks

Glenda the Good Stitch is saying many, many thanks to all of you who took the time to complete the survey questions from last week.  Wow!  Did you ever provide lots of food for thought and great topics for the Good Stitch to discuss in the coming weeks and months.

I generally don't repeat blog information very often, but we've had an influx of new SFD followers, and obviously they don't all know what you might know.

Narrowing the Pants Leg

One respondent asked about the leg width of the SFD Pants pattern.  She said that due to her larger hip circumference, when the pants pattern was said and done, she felt the leg width was too wide.  Even though the leg width doesn't grade out as wide as was needed for the hip circumference, for her height, she wanted the leg narrower.  Personal preference comes into play her, as some ladies might say the leg width was just fine.

So here's a video showing you how to narrow the leg.  It's very simple to do as long as you keep the amount removed basically the same on the inseam and side seam.


I often get asked how long the pant length should be.  First, it all depends on the height of heel you'll be wearing with that particular style of pants.  Generally, the higher the heel height the longer the pant length. 

In addition to heel height, you also need to think about hem circumference.  Here's a little rule of thumb for the length and circumference of the hem:  The skinnier/narrower the width of the pants leg (like in skinny jeans), the shorter the pant length should likely be.  The wider the circumference of the pant hem (as in flared leg pants), the longer the pant leg should likely be.

Once again, for those of you how are relatively new to Sure-Fit Designs and may not be aware of all the educational resources we offer, make sure you spend some time in the SFD Learning Center Video Library.


Your Most Favorite and Useful Sewing Notion??

And on a totally different topic, please use the comment box below to tell me the most important (sewing) notion you'd simply never want to be without when garment sewing.

Thanks so much,
Glenda...the Good Stitch!


Cropped Leg Pants Continued

Remember last week I showed you the easy jeans-style inset pocket?  Well this week I must do a quick review of the seam down the center of the back pant leg.  Even though I typically don't put this seam down the back leg of my pants pattern, I decided to for these cropped leg pants.

This seam really can make a big difference to the fit.  For those of you with a flat butt or for the larger backside in relation to relatively thin legs, this seam is a life-saver!  Team that up with a horizontal fish-eye dart and you've got a winner.


Now...once the seam is down the center of the back pants leg, then I also incorporated a small horizontal fish-eye dart.

Here's a close-up.

I think you can see the seam a little better in this close-up.  The fabric has kind of a waffle-like texture and honestly, the seam just simply gets lost.

Once you've refined your personal pants blueprint to include this seam and the horizontal fish-eye dart, just use your pattern over and over again.  Two extra seams takes no time at all to sew.  Just change the style of waist edge treatment, the opening details, width of leg and finished length - they all will give you satisfaction.

I should mention that because this was a stretch-woven fabric, I chose to finish the waist with 2" (5 cm) wide elastic.  They are totally pull-on because the fabric had enough stretch to pull up over my hips.  Actually, this pattern is a combination of the yoga/travel/comfort pants from Pants that Mix n Multiply and the easy jeans-style inset pocket from your SFD Pants Kit instruction book.

Here's the video on how to draw the horizontal fish-eye dart in the back leg of your pants pattern.
It's not too long.  Please take a look if you haven't watched it before.

If you so choose, when you're sewing this center leg seam, leave a 4" or 5" slit/vent open at the hem level.  Yes, you are emphasizing the seam, but now the design all looks like an intended variation.

Have fun and enjoy the fit!

Kindly,
Glenda...the Good Stitch!

Easy Front Inset Pocket in a Stretch-Woven Cropped Pant

I was given a remnant of fabric - just enough to sew a pair of cropped pants with an easy front inset pocket.  Since it was a stretch-woven, I did size down my body blueprint 1 measurement dot.  This seemed like enough at the time, but as can happen with stretch knits and stretch-woven fabric, I still basted the seams first - did a try-on - and ended up slimming the hip line even a little more.  You just never know how much it's going to give and how it's going to feel on your body.

Always do a stretch test by picking up 10" on the crosswise grain and stretch it comfortably.  This stretched up to 13" meaning it's a moderate stretch knit.  It should only need to be sized down one dot, but what this doesn't account for is the fabric's ability to rebound or recover.  This particular piece didn't have great recovery.

Now on to the easy inset pocket in the pants front.  The upper and under pocket is all one piece of fabric.

Then you fold the pocket lining - in this case - the beige fabric - up so that the lower cut edge meets back up at the waistline.


If you'd made the pocket lining out of the same fashion fabric, then you would not need to face the 'under' pocket.  But that's not always suitable or practical if the fashion fabric is too heavy.  In this instance, the next step was to cut a shaped facing piece and sew it on to the right side of the waist edge of the under pocket lining.


You can also see that the inside edge(s) of the pocket bag have been sewn/serged together.  (Likely best to sew the topstitching on the pocket opening before sewing this inside bag seam).


Topstitch the pocket opening if you wish.  Then with the pocket in position, baste through the pocket bag and the side seam and the upper pocket edge to the pants front at the waist edge to hold it in place during the remainder of the construction steps.

This very easy pocket designing and sewing technique is found on page 22 & 23 of your Sure-Fit Designs Pants Kit Instruction Book. It's a Jeans style of pocket without the fuss of a separate upper and under pocket.  If you haven't yet, try it to see just how easy it is.


Kindly,
Glenda...the Good Stitch!

Tying it all Together

Sometimes it's difficult for some of you to visualize taking an idea from 'here' and mixing it with an instruction from 'there', then adding a little something extra from 'where'. As so many of you know, the Sure-Fit Designs system is not just a fitting system. It also offers all kinds of written instructions and video information on not just fitting, but on designing with your body blueprint (sloper) once you have it completed.

For those of you who follow this Sure-Fit Designs blog, you know that the last few blogs have been on pocket types, applications and sewing technique. As I was preparing the sample photos on drawing and stitching the double welt pocket, I also happened to be at our local JoAnn's (and almost one and only fabric store in Eugene, Or) I came across this novelty stretch bottom weight. I loved it immediately and thought of pants with a welt pocket in the back.

Next step was tying it all together. What style of pants did I want? Since the fabric had about 3 - 4% Spandex, even though it was a woven fabric, I knew it would give when wearing. Skinny came to mind. Jeans came to mind. But I didn't want traditional jeans with the fly front and typical pockets. I wanted to show you the welt pocket.

Here's what I tied together:

My jeans pattern - since wearing ease had already been removed. (Jeans: Behind the Scenes on DVD)

Style #1 - Flared Leg Pants - Elasticized Waist edge from Pants that Mix n Multiply. Though I didn't want flared legs. I wanted skinny all the way to the hem. What I wanted was the side seam invisible zipper and the elastic turned over waist edge.

Blog instructions for the Double Welt Pocket (from last week).

Now for the finished photos:

The double welt pocket.


The invisible zipper and elastic waist edge.


The finished ensemble:

Brown/black leopard-skin patterned fabric for the pants. I guess they could have been tighter but considering I never wear anything skin tight they suited my preferences...and they're totally comfortable. The blouse and jacket is from the SFD Shirt Kit pattern. The blouse has a shawl collar. You'll find directions for this collar on page 44 of the Dress Kit Instruction book. The jacket has a lapel collar and is sewn from a cotton chintz. I love this classic jacket! I've worn it for years and it still looks fine. That's one thing about choosing classic designs - good, bad or boring... they go forever. Remember Chanel...the Chanel jacket...they're still selling it...and you're still sewing it. Yeah!!! for classic designs.
Kindly,
Glenda
PS. I'm going to sew another top for these pants.  I've got the fabric.  It's a really nice cool (colored) brown sport knit.  Now I just need to find the time!

Next installment...I found the time to design and sew the Asymmetrical Pleated T-Shirt from the SFD Shirt Kit.  The directions for this comfy T-Shirt are found in the downloadable Fashion LeafletsClick Here if you're interested.


April Fit & Sew Retreat: Photo Story

The Sure-Fit Designs April Fit & Sew Retreat has come and gone.  We had ladies from Canada, southern California, Washington, Utah and Iowa.  And what a lovely mix of ladies they were. 


During the first 3 days they worked on Pants fitting, drawing of the pants pattern, and sewing the test pants. If there was time, they moved on to drawing and sewing the Yoga pants project.  It's a good way to learn about working with knit fabrics in relation to the SFD master pattern and how to size down depending on the stretchiness of the knit.


All of the Sure-Fit Designs Fitting Retreats are held in 'Our Sewing Room' in Springfield OR (sister city to Eugene OR).  Our Sewing Room is a wonderful studio to teach and work in.  Lots of daylight, high ceilings, great lighting, cutting tables - enough for everyone to have their own - and has available sewing machines if you can't (or don't want to) bring your own.  Our Sewing Room was one of the sewing studios featured in Vogue Sewing magazine a couple of years ago.  There's only about 10 of these specialized sewing studios across the USA.  I'm so fortunate that I have this fabulous facility to teach in.


Sewing machines are supplied, but you can certainly bring your own.  And if you forget a supply item such as shears, rotary cutters, tape measures, rippers, tracing carbon and tracing wheels etc. are available for your use.


We had one lady with obvious asymmetry.  It was an easy refinement by using elastic at the waist to help identify and mark the low hip.


I know lots of you resist the thought of using a center leg seam to help contour the fabric to your body curves, but once done this and you see the difference in the fit, you'll become a convert.


As you look at these photos, please be realistic about some of the wrinkles you are seeing.  Poor lighting, wrinkly fabric, stitching techniques and lack of pressing are often the culprits.


Then we moved on to bodice fitting, drawing and sewing.  As you would suspect, there were a variety of body issues to address from very full busts, broad back, sway back, rounded back and large upper arm...


...to sloping shoulders and necklines that needed a little more breathing room.


And last, but certainly not least, a few of the almost completed yoga pants.


Everyone accomplished a lot based on their ability and on their particular fitting issues.  And though some projects weren't completed, for the time that was allowed, everyone did an excellent job.  Well done ladies!


If any of you are interested in attending a Fit & Sew Retreat this year, there is still 1 space available in the May 18 - 21 Pants Fitting Intensive (a 4-day workshop) and there are 2 spaces available in the October 19 - 24 Pants & Bodice Retreat (a 6-day workshop).  For more details on fees and other important information, please click - SFD Classes & Events or call me directly at 541-344-0422 (OR - PST)


Princess-Seamed Pants

I still hear lots of ladies groan every time I suggest using a seam up the center of the pants leg.  For some reason or other, they must think there is some stigma attached to using a seam up the center of the leg of the pants pattern.

But when you have quite a flat backside, or when you have a large high hip or abdomenal circumference (meaning a large waist and stomach area) going to a flat backside or pencil thin legs, this center leg seam is truly a life-saver.  With this seam, you can deepen the stitching curve under your backside and you can use it to help taper the legs.  Those of you who have seen this process and the results being pants that fit so well, are true converts.

But have you thought of using this same seaming concept up the front of your pants leg?  In this photo, you'll see pants front - with one 'regular' leg and one 'seamed' leg.
Please keep in mind these are 'test' pants - hence all the other wrinkles - but you can likely see the remarkable difference between the leg with or without the center seam.  It simply fits so much better.

Here's the completed side and back views.

 Do you remember my NY trip blog?  Well, while 'shopping' those famous 5th. Ave stores, another design I saw LOTS of  was pants with seams - down the back and front of the pants leg.  Designer's simply know you can get a superior fit when you incorporate these leg seams for shaping.  Here's a photo of the front of a pair of pants (sorry I wasn't holding them totally upright), but you can still see the front leg seam.  By the way, these exposed zippers are very popular too.  (FYI - These pants were priced at $249.00).  How simple are these for us talented seamstresses!


Now, to make this happen, I suggest watching this video.  This concept of adding seams to the interior of both the front and back legs of your pants pattern is significant enough to have made a video on the process.  Please take a few minutes to watch.

(Well, this is crazy, but I'm having great difficulty accessing this video from YouTube and putting it in this blog.  So until I get that figured out, please just click on this link and it will take you directly to the video on the YouTube site.  It's called

Just give this a try to see how simple and effective the pants princess seam can be to help refine your pants fit.
Kindly,
Glenda

luvne.com resepkuekeringku.com desainrumahnya.com yayasanbabysitterku.com